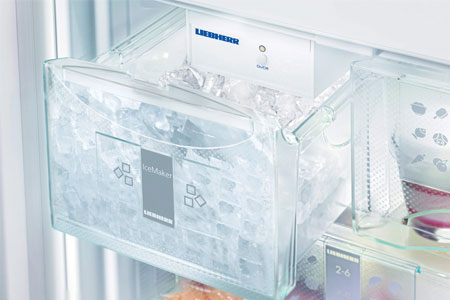
If you are in the restaurant business or live in a region marred by heat throughout the year, an ice maker is a must-have appliance for your household. This is because ice makers are designed explicitly to deliver you fast, clear, and efficient ice whenever required. Modern-day ice makers come in different shapes and sizes. The majority of them are configured to deliver a single type of ice with maximum efficiency, whether that is in the form of a cube, nugget, or flake.
One such is a countertop nugget ice maker. If you look carefully, nugget ice makers are the most expensive ice makers in the market. But have you ever wondered why are nugget ice makers so expensive? This is precisely the question we will be answering through this article. This article will walk you through everything that contributes to the high value of a countertop nugget ice maker.
What Are Nugget Ice Makers?
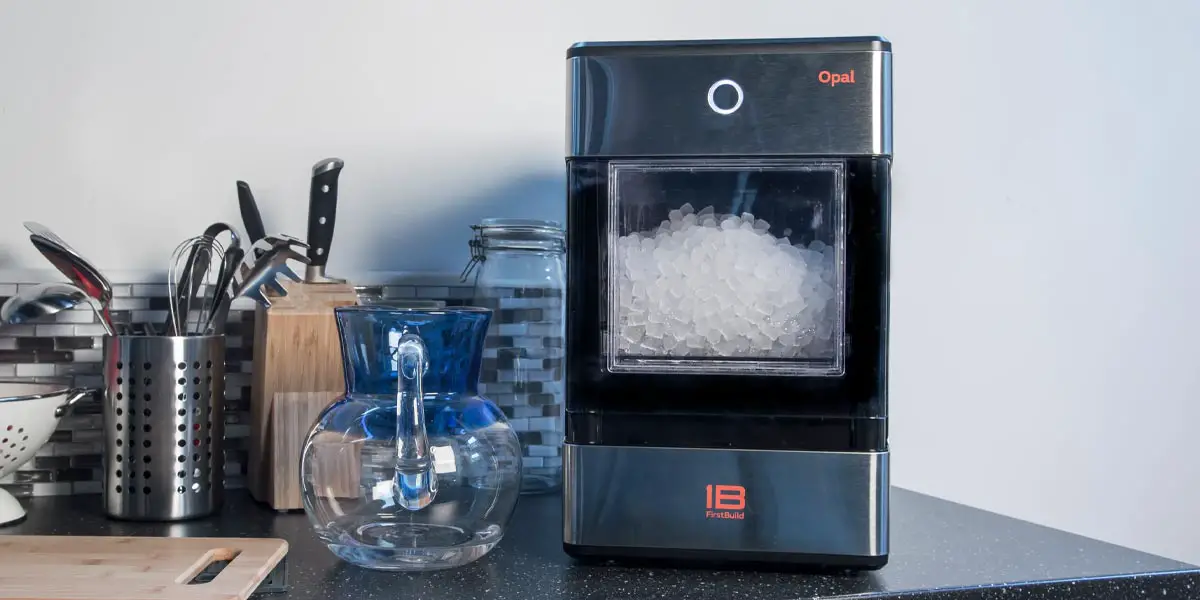
When it comes to ice, most of us are familiar with ice cubes, ice balls, or shaved ice. But nugget ice happens to be the most sought ice in the modern-day market. If you have ever had nugget ice, you’ll know that the ice is soft, airy, and chewable.
This is because nugget tends to flow around more evenly than ice cubes and ice balls. Given all these properties, you need a nugget ice maker, a machine designed explicitly to help deliver fresh nugget ice. Since the process is long, counter nugget ice makers are quite expensive.
How Much Do Nugget Ice Makers Cost?
Given its unique properties, nugget ice is the most sought ice out there. Although it possesses some unique properties, it features a significantly complicated process. To bring about this process, nugget ice makers are generally expensive because they are largely purchased for business purposes.
An average undercounter nugget ice maker costs around $4000
An average dispensing nugget ice maker costs around $5500
An average commercial nugget ice maker costs around $8000
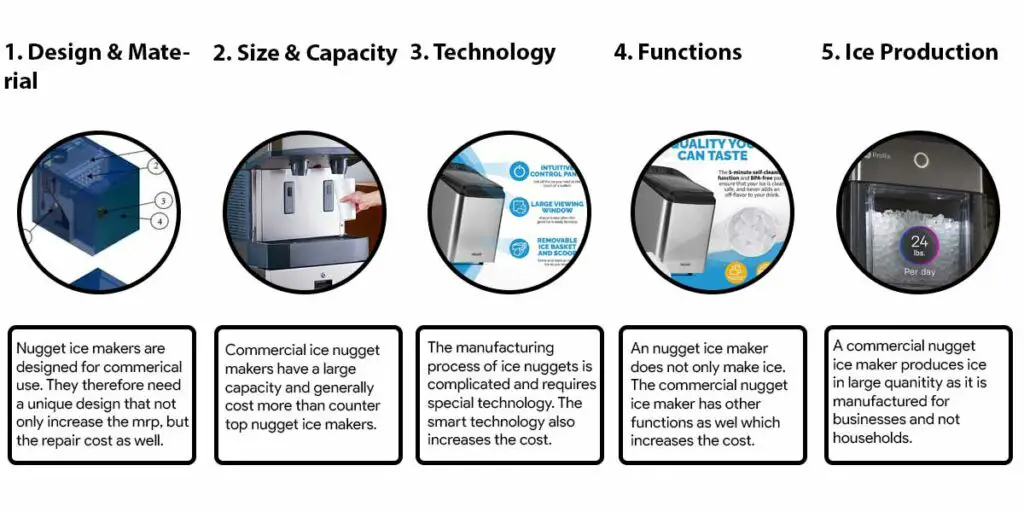
There are a lot of reasons as to why a countertop nugget ice maker is so damn expensive. As we mentioned, making nuggets is a very complicated process. Primarily, nugget ice makers tend to be expensive because of their size, overall design, technology, and their ability to deliver soft and chewable ice nuggets. Let’s take a quick look at what contributes to the high price tag of the best countertop nugget ice maker.
1. Design And Material
Nugget ice makers are designed explicitly for commercial usage, which adds to the cost. Given its unique design, even small repairs need you to call in an expert to look at the machine. Since their functionality is on the higher side, these nugget ice makers comprise a built-in drain pump, sturdy base construction, stainless steel panels, and other features.
2. Size And Capacity
A commercial nugget ice maker is very big. The size is larger to meet a wide array of customer demands. The larger the size, the more materials the machine translates for producing ice. Although the size adds to the machine’s functionality, it largely increases the cost as well. An average nugget ice maker has around 3 lbs of ice storage capacity and can function at an ice-making rate of 24 lbs per day.
3. Innovative Technology
Although the process to deliver nugget ice is complicated, a countertop nugget ice maker comes equipped with all the features required to make it possible. These nugget ice makers feature a technical set-up aimed primarily at large-scale nugget ice production. Given its huge size, a more smart technology drives the machine to deliver fast and efficient ice.
4. Convenient Functions
If you think a nugget ice maker delivers only ice, then you are mistaken. This is because a commercial nugget maker is designed to perform a wide array of functions and not just deliver ice. This is precisely why owning a commercial ice maker can make you a reliable ice supplier.
5. Production Of Ice
When you opt for a commercial ice maker, it is bound to deliver a large quantity of ice. Similarly, commercial ice makers are designed explicitly to favor large ice production. To make this possible, there are special regulatory features that ease the operational control of the product and add to overall productivity. But these regulatory features again mean additional costs.
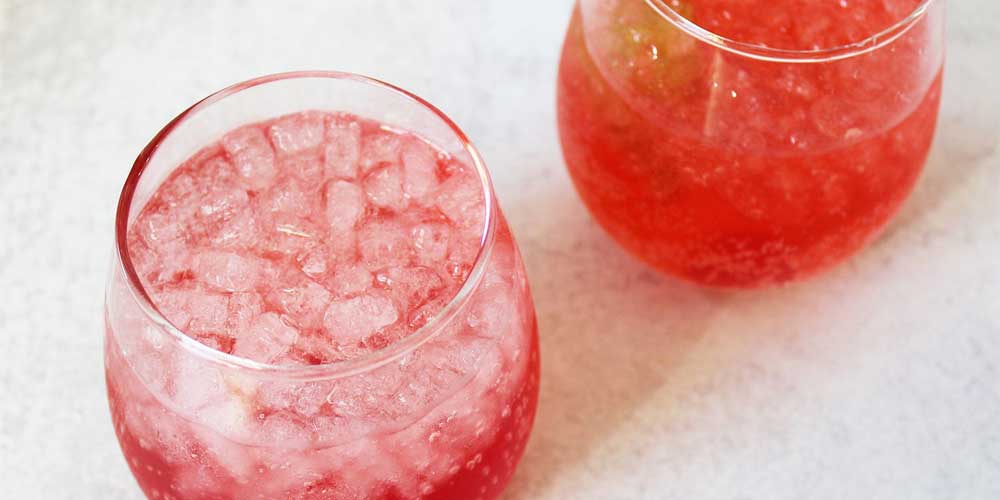
Image source: Chris Loves Julia
The Bottom Line
As we mentioned at the start of the article, having a commercial maker is a necessity if you are in the restaurant business. But since commercial nugget ice makers are large and expensive, they aren’t your ideal household appliance. Instead, you can opt for a countertop nugget ice maker for your house as they feature a compact design and are relatively inexpensive compared to a commercial one.
FAQs
The many benefits of nugget ice are that it can fit into any cup, glass, and container regardless of its size. Similarly, nugget ice tends to soak up and absorb all the flavor of any liquid. They are soft, airy, and chewable and won’t take a toll on your teeth.
Yes, you can make nugget ice at home without having a nugget ice maker. Fill your ice tray with frozen club soda or carbonated water and place it in the freezer. Once done, simply crush the ice cubes using a blender or a muddler.
Unlike ice cubes or ice balls, nugget ice is soft, airy, and chewable, meaning that it won’t take a toll on your teeth. However, consuming too much nugget ice might mess up your respiratory system and cause a cough or cold.
Yes, having a commercial nugget ice maker can be a reliable ice supplier. A commercial ice maker is big and expensive, so it isn’t the wisest choice for a homeowner. Instead, you can opt for a countertop nugget ice maker for home-usage.
The estimated life expectancy of an average nugget ice maker is deemed to be between 4-10 years. However, this largely depends on the brand you opt for, followed by the machine’s warranty.
What could be simpler than making ice? One of the most common ways to make cubed ice is to use a tray. However, there may be times when you need more ice than usual and do not have an extra ice tray, or your tray may go missing just when you require it the most. Every problem, of course, has a solution.
It’s times like these when you wish you had some other options.
We decided to look for the coolest and most practical DIY ways to make ice cubes without a tray because it’s life hack season.
This article contains some tips and tricks for making ice cubes without a tray. However, please note that all these methods with give you hardened ice cubes like you’d get from freezers. Continue reading to find out.
How To Make Ice Without An Ice Tray
Ice is a necessity to cool down the summer. Be it shaved ice or your beloved cubed ice, you’ll find yourself seeking those frozen gems quite often. And if you find yourself in a situation where you need ice but don’t have an ice cube tray, you’ll have to think outside the box.
The list below will help make ice without a tray that will work well in a bit of an emergency.
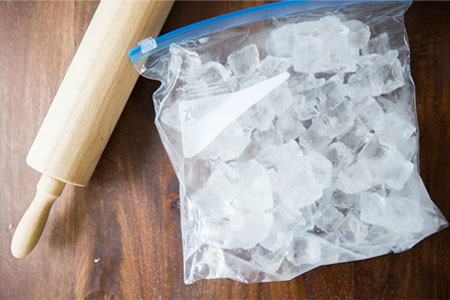
1. Ziploc bags
Because they are simple and quick to deal with, Ziploc Bags are excellent alternatives when you don’t have an ice tray. Ziploc bags are available in a variety of sizes. They can be filled with water if you get the really small ones, typically three inches by five inches. If you do not have access to small bags, larger bags will work just fine.
Fill a Ziploc bag halfway with cold water and place it in the freezer for a few hours. Don’t refill the bag, or it may explode, or the ice may become a big block and difficult to break. Also, lay the bag flat to allow the water to freeze evenly. It will make a medium-thick layer of ice that can be easily broken into smaller pieces.
The disadvantage of using Ziploc bags is that you won’t get perfectly shaped ice. If you don’t mind the shape of the ice, a Ziploc bag is one of the best options.
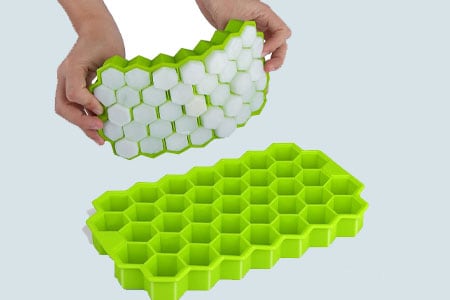
2. Silicon molds
Silicon molds are now extremely common and widely available. It comes in various fun and unusual shapes and is much easier to remove from the mold than a regular ice tray.
You use the silicon mold in the same way that you would a regular plastic ice tray.
Place the molds in the freezer for several hours after filling them with water, leaving them overnight results in harder, well-frozen ice that melts more slowly.
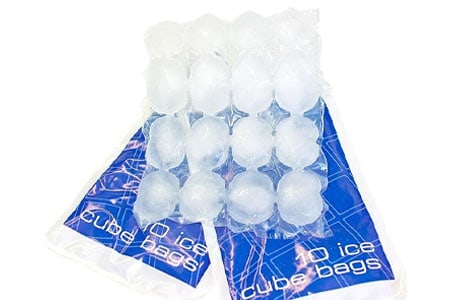
3. Freezer bag
Freezer bags work well in place of an ice tray. It is extremely simple to learn how to use freezer bags. Fill the freezer bag with water. When it’s full, seal it up and place it flat in the freezer. These freezer bags will be frozen after a few hours.
The advantage of using these bags is that they prevent the transfer of food odours to the ice.
Because freezer bags have separating lines inside, this ice freezing method creates more perfectly shaped cubes.
4. Egg Carton
It’s an unusual solution to use egg cartons instead of an ice tray. However, they do work. It’s more of a last-resort option than a regular one. Ideally, they should only be used when you don’t have an ice tray or silicone molds but still want well-shaped ice cubes. You’ll also need some aluminum foil for this method.
To make ice with an egg carton, spread the aluminum foil on the left third of the carton, where the eggs rest . It should perfectly sit right in. It is done so that the foil can shield the carton from water.
With the foil still protecting the carton, fill each compartment with water and place the carton in the freezer. Allow it to harden for several hours.
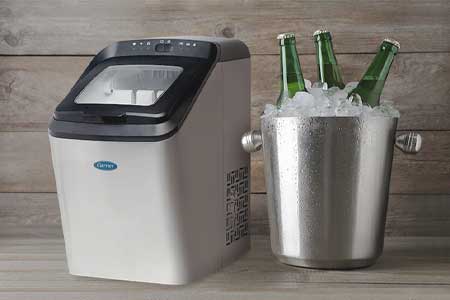
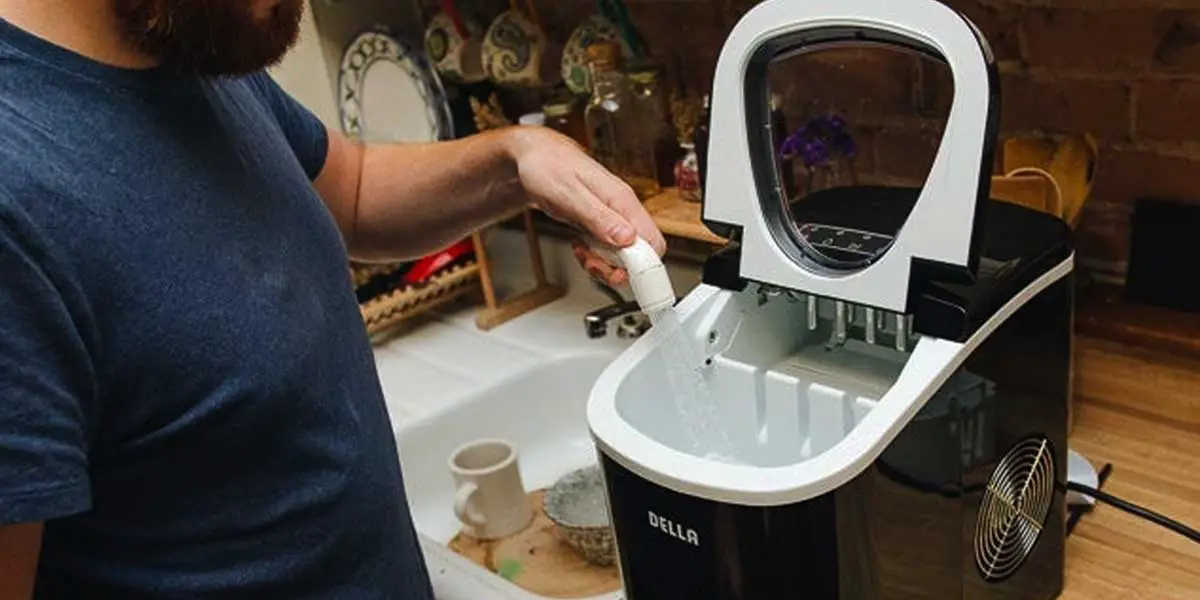
5. Portable and Countertop Ice Makers
Using a portable ice maker is an excellent way to make ice without a tray. Portable ice makers are also known as countertop ice makers. Portable or countertop ice makers are small, lightweight, and take very little space in the kitchen. They are very convenient for small houses, and you can take them with you on a boat, or even on a picnic. They do, however, require a power source.
Ice makers can usually make more ice than a Ziploc bag, freezer bag, or egg carton. The ice machine operates on autopilot. It can make ice very quickly. A batch of ice is ready to go in seven minutes to fifteen minutes. Further, you may have options for the texture of your ice. In a freezer, you’d only be able to make cubed ice, but with portable ice makers, you may as well make nugget ice (slightly different from cubed ice).
This machine is simple to operate. Connect it. Fill the reservoir to the top with water. Turn on the machine and select the size of ice needed – small, medium, or large. After a few moments, the first batch of ice is ready. When the ice bin is full, the machine will shut down automatically.
Ice Makers come in a variety of capacities, so you can find one that meets your requirements. The smallest can produce between 20 and 26 pounds per day, while larger ones used in restaurants and pubs can produce between 28 and 40 pounds per day.
Since these machines are heavily insulated, the ice will remain frozen for an extended time. As usual, the ice will melt with time. The melted ice goes back to the reservoir, and the machine will make new ice from it.
6. Built-In Freezer Ice Maker
It is a long-term ice-making solution that you can use even if you have an ice tray nearby. Let us now discuss the built-in freezer ice maker.
Large freezers usually accompany large refrigerators with built-in ice-making kits. The advantage of this option is that you can get ice whenever you need it.
You don’t have to wait long for it to freeze because the ice maker does it for you.
The disadvantage is that such a fridge will be expensive. Furthermore, the ice-making kit will take up a lot of space inside the freezer, requiring more kitchen space.
Conclusion
There are several excellent methods for making ice cubes without the use of an ice cube tray. You can use Ziploc bags, freezer bags, or even egg cartons if you need ice right away. It will also work if you have any clever ideas of your own. If you don’t have any, we hope this article was helpful. However, if you need perfect ice cubes, an ice maker is unquestionably the best option.
One of the most important appliances in the modern household is an ice maker – and even if this sounds like a trivial purchase, it is important to consider how much ice you consume regularly.
Especially during the summer, having a portable nugget ice maker can make a huge difference in terms of saving down on costs of buying bags of ice from the local store while also making sure that you have a batch of freshly made ice always at your disposal to enjoy your favorite iced drinks.
However, like other appliances, an ice maker needs to be cleaned regularly for its efficiency to be maintained – hence, we’ll be discussing some easy ways of how to clean a portable ice maker using simple supplies found in all households.
Why Should You Clean Your Ice Maker
Like with most devices, your ice maker will work best when it is being maintained regularly and cleaned up from time to time. Not cleaning up your ice maker regularly may result in the build-up of undesirable substances such as limescale, mineral deposits, mold, and other such impurities. Applies all the same for all kinds of ice makers, commercial or domestic use flake, sonic or cube ice making machines.
All of these impurities accumulated may eventually lead to your ice having a cloudy appearance, melting easily, or having a distasteful odor to it. Once you start getting ice from your ice maker that fits these criteria, you have to look into how to clean a portable ice maker.
What Are The Benefits Of Cleaning Your Ice Maker?
If you’re still on the fence about cleaning your ice maker, then the following benefits will convince you to clean your ice maker regularly without fail.
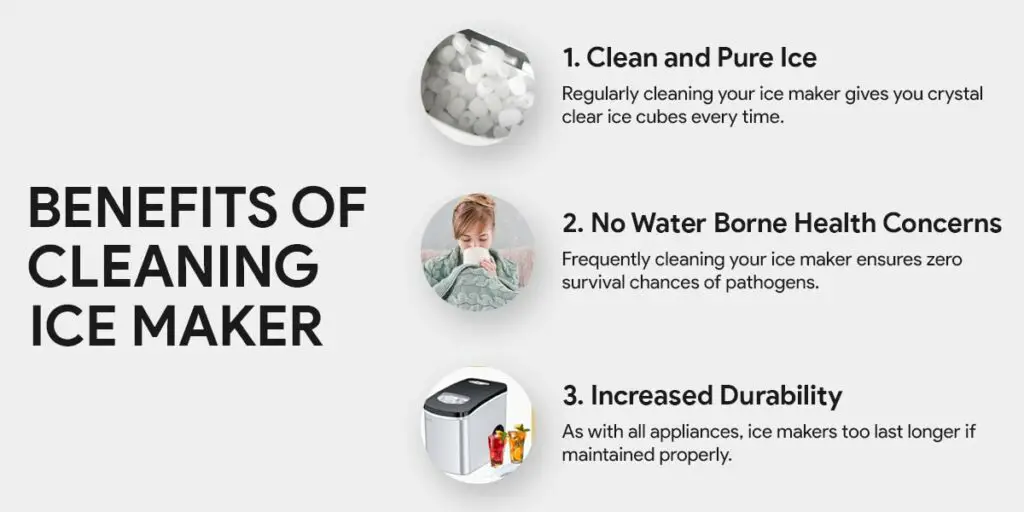
1. Clear And Pure Ice
Once you go a while without cleaning your ice maker, you’ll start to realize that the ice you get out of it isn’t as clear and pure as it used to be. Cleaning your ice maker every now and then will ensure that your ice is completely transparent without the presence of impurities giving it that cloudy appearance we’ve previously talked about. If the ice maker you purchased was marketed as a clear ice maker, it becomes even more essential for you to clean it frequently.
This eventually leads to your ice tasting fresh as well, without it absorbing impurities present in the ice maker, giving it a vaguely unpleasant taste and odor. It also helps to use purified water to make your ice since that can lead to further cleaner ice from your ice maker.
2. No Water Borne Health Concerns
Naturally, once you understand the inner workings of an ice maker, you’ll realize that it can accumulate impurities quite quickly. Since the processes of the ice maker are largely performed with the help of water, this means that impurities such as mold receive a breeding ground due to the moisture and thus accumulate – leading to far-reaching consequences for your health by absorbing and developing strange tastes and odors.
3. Increased Durability
One of the most important determining factors in the working of your ice maker is how long it can last while working at optimal efficiency. If you do not manage to clean your ice maker regularly, the durability of your ice maker slowly dwindles, and it starts to function at subpar efficiency.
How Often Should A Portable Ice Maker Be Cleaned?
While the answer to this question largely depends on how often you use your ice maker, it is recommended that you clean it every month – or even less than that, if you’re using it heavily.
At the most, however, you should be cleaning your ice maker once in three to six months – since delaying the cleaning procedure further than that can lead to the buildup of the aforementioned dirt and grime that we’ve previously talked about. Additionally, you can attempt to clean your ice maker once you notice changes in the quality of your ice, such as bad odor and a cloudy appearance. Here’s my detailed take on cleaning an ice maker that has obvious slime and mold build up.
Methods To Clean A Portable Ice Maker
Now that you know cleaning your ice maker is absolutely imperative, you must go over the many methods possible for how to clean the ice machine. Don’t worry – all of these processes can be easily performed with minimal effort and supplies.
1. How To Clean Ice Maker Using A Detergent
a. Gather All The Types of Equipment
It is important to know what supplies you need to find out how to clean igloo ice maker with a detergent. All you need is multiple dishcloths that are soft and dry, some warm water, a toothbrush or Q-tip (whatever is more accessible), some dishwashing detergent, and a medium-sized spoon. Once you have all of these supplies at your disposal, it is time to move on to the next step.
b. Unplug The System
Naturally, the next step for how to clean a portable ice maker is to unplug your ice maker from its power source. This is to ensure against any untoward accidents such as electric shocks – so turn off your ice maker after making sure that it has stopped making ice, and safely unplug it.
To separate water and electricity sources, it is wise to check the water reservoir to make sure that it does not hold any water – and if it does, you can drain it out.
c. Remove Interior Parts Of Ice Storage Bin
The next step on how to clean countertop ice maker is to prepare your ice maker for cleaning. You can do this by dismantling the interior parts and keeping them aside for cleaning in the next step.
This is also when you start to clean any remnants of ice from when you’ve used the ice maker – so if there are any sticky ice cubes still lodged inside, attempt to get them out with the spoon or some warm water.
d. Clean The Interior Parts
Now that we’ve come to the actual cleaning part for how to clean manitowoc ice machine, you need to fill up your sink with some more warm water and dishwashing detergent to prepare the cleaning agent.
In this solution, dip one of your dishcloths and then start scrubbing away at the interior parts that you’ve previously removed. You can use either the Q-tip or toothbrush for this step, depending on whether your ice maker has a filter or not.
e. Clean The Interior
Now that you’ve finished cleaning all of the parts that could be removed from the ice maker, it is time to start cleaning the actual interior of the ice maker – and this includes the ice mold. Here, you can once again use the toothbrush dipped in the detergent solution to scrub away at scaly water. You can also use some diluted bleach if the dirt has built up for quite a while now.
f. Start The Portable Ice Maker
Lastly, it is time to do some test runs of your newly cleaned ice maker. Here, you will try to run the ice maker using the detergent cleaning solution that is residual in the ice maker and then make ice out of the same to dispose of later.
Once the cleaning agent and diluted bleach have been washed out of the ice maker, it is time to run it with warm water once again to ensure that there’s no residual cleaning agent left anymore – after which your cleaned ice maker is now ready to use.
2. How To Clean Ice Maker With Vinegar
a. Gather The Equipments And Prep The Ice Maker
Like cleaning your ice maker with dishwasher detergent, you need to prepare your equipment and supplies to figure out how to clean ice maker with vinegar. For this, you need the same supplies as last time – multiple dishcloths, warm water, toothbrushes, and paper towels for scrubbing, a medium-sized spoon, as well as a measuring cup.
For the cleaning agent, you need vinegar, some baking soda if the grime is particularly tough, and a pitcher. To prepare your ice maker for cleaning, you need to take apart all its interior parts and unplug the ice maker first. If there’s residual liquid in the ice maker, get rid of it and wipe it down with a cloth to prevent electric shocks. Take this time to get rid of any lodged ice cubes as well.
b. Make The Cleaning Solution
Making the cleaning solution to clean the interior of your ice maker is quite simple but extremely crucial at the same time. Using vinegar ensures that any calcium deposits or scales are removed since vinegar can easily dissolve them.
For the ice maker cleaner solution, all you need to do is mix together vinegar and warm water in a 1:10 ratio, respectively – effectively meaning that you have to take ten measures of warm water for every measure of vinegar. You can choose to use white vinegar for this purpose since the odor is washed out effectively after the cleaning process.
c. Clean The Ice Maker Accessories
This step for how to clean an ice machine entails you cleaning out the interior accessories of your ice maker. All you need to do is use the toothbrush or Q-tip or even your dishcloth, dip it into the vinegar cleaning solution, and then scrub or brush down all the accessories of the ice maker.
This is also the step where you can use baking soda to clean out any hard water lines or other such tough stains and impurities that are difficult to get out. However, if you do use baking soda, it is pertinent to clean out any traces of it with the final wash. You can also clean your ice maker filter, if any, with the help of the toothbrush or Q-tip – or let it sit in the warm water filled in the sink to remove any grime.
d. Clean The Interior Of The Machine
As before, you need to clean the actual interior of the ice maker once you have cleaned all its accessories. In this step, you need to take your cleaning dishcloth once again after dipping it into the vinegar cleaning solution and then wipe down the interior of the ice maker.
You can use the cleaning solution as a spray to reach corners of the interior that are difficult to get – and even use your toothbrush or Q-tip to get those nooks easily. If the lime deposits are stubborn, you may need to use pure vinegar to efficiently clean your interior.
e. Start The Machine And Make Some Ice
As done with the detergent solution previously, you now need to go for a test run of your ice maker. Keeping the cleaning solution of vinegar and pouring the rest of the remaining cleaning agent into the machine, you need to make some ice with the remnants of the cleaning solution to ensure that the ice maker is running and functioning optimally.
This will allow you to disinfect your machine cleanly with the last cleaning solution and make sure that the cleaning agent is not left as residue when you’re using your ice maker after it’s been cleaned.
f. Replace The Accessories
Now that your ice maker has now fully been cleaned, it is time to replace the interior accessories that you had previously taken out for the purpose of cleaning. Once these accessories or parts have dried after been cleaned thoroughly, wipe them with the paper towels you had to prevent any water stains from making them look distasteful.
Once you’ve done this, slot the accessories back into where they belong, and your ice maker is now clean with the help of the vinegar cleaning solution and completely ready to use!
How To Maintain Your Portable Ice Maker
Following the fact that prevention is always better than cure, let’s explore ways to ensure that your ice maker does not accumulate grime as quickly and frequently and functions optimally.
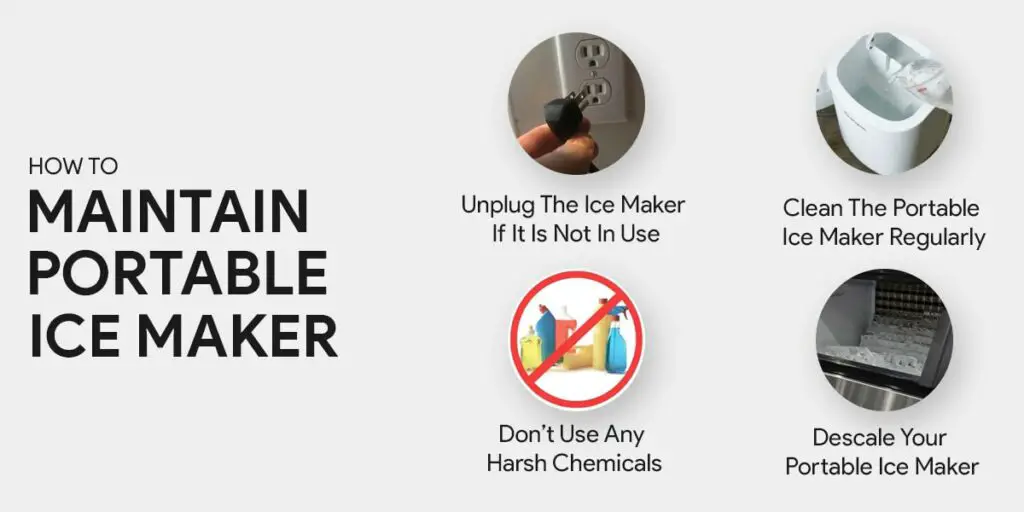
1. Unplug The Ice Maker If It Is Not In Use
While this one seems like a bit of a no-brainer, it makes a huge difference to the durability of your ice maker. If you’re planning to be away for an extended period of time, switching off and unplugging the ice maker can help ensure cleanliness – since keeping it plugged in is virtually pointless.
Wiping the inside of the ice maker with a dry cloth will ensure that moisture is kept away – making sure that mold does not build up in the interior of the ice maker.
2. Clean The Portable Ice Maker Regularly
While the above-mentioned processes on how to clean ice maker may take time, it is not mandatory to go through the entire process every time you want to clean your ice maker.
Merely taking a damp dishcloth and wiping the interior of the ice maker can go a long way in terms of keeping away impurities like limescale and mold. Most portable ice makers use air-cooled mechanisms to avoid overheating. You must occasionally deep clean the entire mechanism to keep it working flawlessly. Provided that you do this every week, you won’t have to perform the drawn-out procedure of disassembling your ice maker every time.
3. Wash The Ice Storage Basket
The ice storage basket is that part of your ice maker that is where all of your ice is stored. Once the ice maker has made your ice, it is delivered to the ice storage basket – so naturally, it follows that you must always clean your ice storage basket in order to prevent impurities from being transferred on your ice.
Similar to cleaning the entirety of the ice maker, all you need to do is scrub it with a mild cleaning solution and warm water.
4. Don’t Use Any Harsh Chemicals
Using harsh chemicals on your ice maker is something that can cause immense damage to the machine and your health in the long run. It is unwise to use harsh chemicals for the interior parts of the ice maker since they can easily affect the quality of ice or even boiling water which can melt away at the plastic used in the ice maker.
The accumulation of hard water in your ice maker can lead to the buildup of scales in the interior parts of your ice maker – and can thus be hazardous for its efficient functioning.
The buildup of scales, or calcium deposits, can greatly affect the working of the ice maker. This can easily be avoided by processes such as using a readily available descaler or a vinegar solution that reacts with the calcium deposit and dissolves the same, effectively cleaning out the formation of scales.
Storables
Conclusion
While there is no end to how useful an ice maker is for daily use, it is apparent that to ensure the optimal working of your portable ice maker, it needs to be cleaned and properly maintained – and luckily, the processes to do so are extremely easy. With the right equipment and some care, you can enjoy a steady supply of ice for as long as you need!
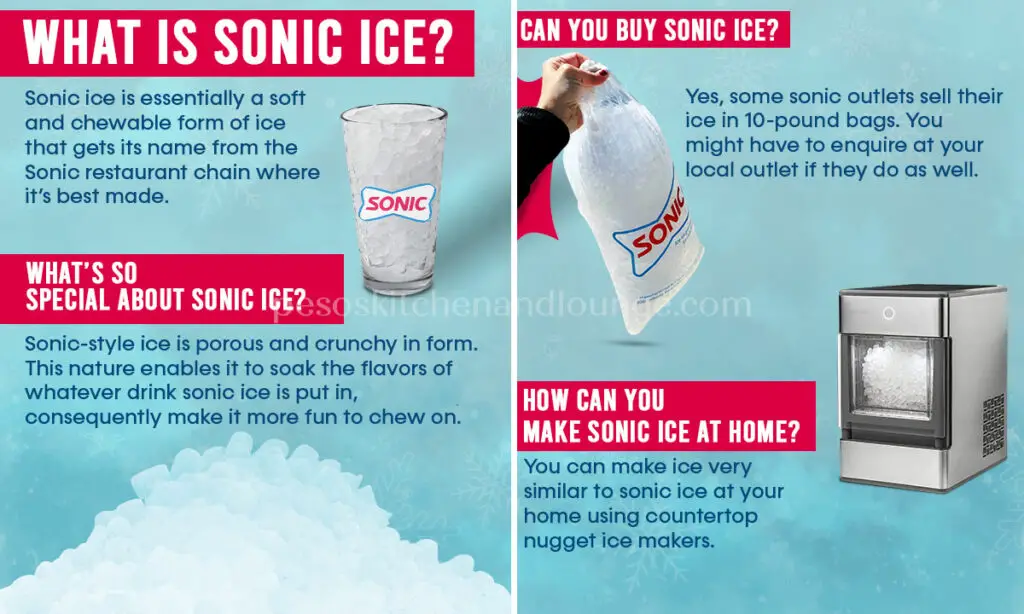
Did you ever think that the ice you add to your drink every day could be converted into something unique and fun? This quirky rendition of our daily ice- is popularly known as Sonic ice and is chewable!
Sonic Ice is special in so many different ways that those who’ve tasted it call it “the caviar of the ice world.” Its USP is also the fact that it’s porous and soaks up the flavor of the drink, making it extremely fun to chew. It dilutes very slowly, keeping your drink chilled for longer, and the leftover ice is perfect for snacking! The question of the hour however remains “how to make sonic ice?” and that is exactly what we are going to address. Read on to find out how to make sonic ice at home in the easiest way possible!
What is Sonic Ice?
The first question that comes to mind is “what is sonic ice.” As mentioned above, Sonic ice is a type of ice that is soft and chewable. It is known by various other nicknames, such as nugget ice, pearl ice, and cubelet ice. Please note that despite being confusing, flake ice, nugget ice and cubed ice are indeed different.
The “Sonic” in the name refers to the popular Sonic restaurant franchises whose signature slushes have become immensely popular.
Image source: YouTube
Sonic Ice comes in various sizes depending on its use. The most common and popular form of Sonic ice is the nugget-ice size, usually 3/8″ to ½” in terms of width and length, and is used in drinks. It is also crushed into smaller pieces and serves as pebble-like shapes. Irrespective of the size, the flavor remains intact, ensuring that it’s fun to chew.
Can You Buy Sonic Ice?
Some Sonic outlets do sell their ice in 10-pound bags while others don’t. It really depends of the demand their particular outlets are faced with. To really know if a local sonic restaurant sells their signature sonic ice, you might have to take a trip to them and enquire about it. If they do, their rates are very reasonable. Last time I checked, you could buy a 10-pound bag of sonic ice for just 3 dollars.
How is Sonic Ice Made?
Often people wonder “how is sonic ice made.” And since Sonic Ice cannot be made using any common ice machine, they also wonder “what ice machine does sonic use.”Most ice makers that make sonic ice commonly known as ‘cubers’ have an auger system. The water enters the machine in a liquid form but exits as coarsely compacted cubes divided into soft, porous nuggets that we call Sonic ice.
1. Clean Water Intake
Every kind of ice requires a basic ingredient for its composition, and that is- Water, of course! Clean water is required to ensure that the quality of the ice produced is up to the mark. Moreover, the kind of water used can also impact the final product.
For instance, boiling the water before freezing releases most of the air trapped in the water, so the nuggets produced are clearer. Filtered water can result in less cloudly-looking nuggets that are softer to chew as well. If you have a preference for appearance, it becomes essential to keep these things in mind.
However, if the aesthetics do not carry much importance to you, then your focus should be solely on the texture and taste. As long as the water is clean and purified, your ice should turn out fine! Consistency of the water is important, and filtering can help you remove unnecessary minerals. This makes the texture of the water is smoother and prevents issues like clogging of the ice machine.
The main freezing aspect of sonic ice begins once the water has been poured into a Sonic Ice Maker. A Sonic Ice Maker is very different from the traditional molds that are used to create ordinary ice cubes. Traditional ice cubes are made by freezing water in a tray made up of several cubic molds. This water freezes when exposed to cold temperatures, and the ice can be removed and utilized immediately.
If you want to know what ice machine does sonic use and how it ends up with such nuggets, the answer is here. A Sonic Ice Machine does not have cubic molds but instead has an auger system. The traditional plate is replaced with a large metal cylinder that contains the auger.
On starting, the inside of the machine drops to a low temperature, and the walls of the cylinder become ice cold. Slowly, thin sheets of ice begin to form along the walls, and that is when the auger begins to turn. It scrapes the ice of the walls and up through the cylinder. The end result is ice flakes that are collected for further use.
3. Shaping Into Nuggets
The final step of the process involves converting these ice flakes into small Sonic Ice nuggets. This process is the answer to the popular question, “how does sonic make their ice?” It begins from the auger and ends in the ice bin, and is usually varies from machine to machine. People often wonder “what kind of ice machine does sonic use” and the answer isn’t a single one, there are various machines that are involved and each differ in some way. However, the most common method involves gathering the flakes and forcing them through a compression tube where they break apart naturally due to various forces.
Some machines also have blades that cut the flakes into nuggets as soon as they exit the tubes. In even more advanced models, the nuggets are compressed at the end before releasing so as to make them slightly harder and firmer. Making them more compressed also improves their longevity. The more expensive the model, the more finesse involved in cutting and shaping these ice cubes.
How to Make Sonic Ice at Home?
Today, Sonic Ice is extremely popular and is no longer restricted to famous fast-food chains and fancy restaurants. Almost everyone knows how to make nugget ice and most create it in the comfort of their home, using a simple residential Sonic Ice Maker! These machines can be set up in your kitchen in no time and will allow you to enjoy chewable ice from the comfort of your home.
These machines are affordable and easy to assemble. One of the most popular and commonly used Sonic Ice Machines is the GE Opal Countertop Nugget Ice Maker.This ready-to-use machine will help you create Sonic-styled ice in under 20 minutes. All you need to do is plug it in and fill the reservoir with water. As the ice melts, the water returns to the reservoir, where it will simply be made back into more ice.
Using this machine, you can create up to 24 lbs. of ice per day and store 3 lbs. at a time for future use in the machine’s bin. And most importantly, you can connect it to an app on your smartphone using Bluetooth and schedule fresh ice for whenever needed- This way, your drinks can always have chewy and refreshing Sonic Ice!
Compact footprint; ideal for countertops and islands
Soft and easily chewable ice
Convenient operation; can be controlled with a mobile application Via BT connectivity
Decent daily output of 24 lbs. of ice
3 lbs. of ice bin capacity
Portable; can be moved around without the concern of a nearby water hookup
Zero water wastage; all water from melted ice is directed back to the reservoir
Limited 1-year warranty (parts & labor included)
Final Thoughts
Not only is Sonic Ice a fun and quirky alternative to normal ice, but it has added benefits. It retains the taste of your drinks, making them enjoyable to chew, and at the same time, is easy on your teeth. However, making sonic ice can be quite a hassle. If you want some quick refreshing ice, nothing beats the good old freezer ice. Just put an ice tray filled with water and let the freezer do its magic. Can’t find the ice tray? Well, you can still make ice cubes without an ice tray.
Sonic Ice is perfect for cocktails, sodas, and other refreshing beverages and is loved by adults and children alike! So what are you waiting for? Get your very Sonic Ice Maker now, and never resort to boring, traditional alternatives again.
Yes — tamales freeze extremely well, and freezing is one of the best ways to store leftovers or prepare meals in advance. Whether homemade or store-bought, tamales maintain their flavor and texture when frozen correctly.
Table of Contents
✅ Do Tamales Freeze Well?
Tamales are perfect for freezing because:
The masa (corn dough) retains texture
The filling stays moist
Corn husks or banana leaves protect them
They reheat easily without drying out
Many people say frozen-then-reheated tamales taste just as good as fresh.
🧊 How to Freeze Tamales Properly
Step 1 — Cool First
If freshly cooked, let tamales cool completely before freezing to prevent condensation and ice crystals.
Step 2 — Keep Husks On
Do not remove corn husks or banana leaves. They protect flavor and moisture.
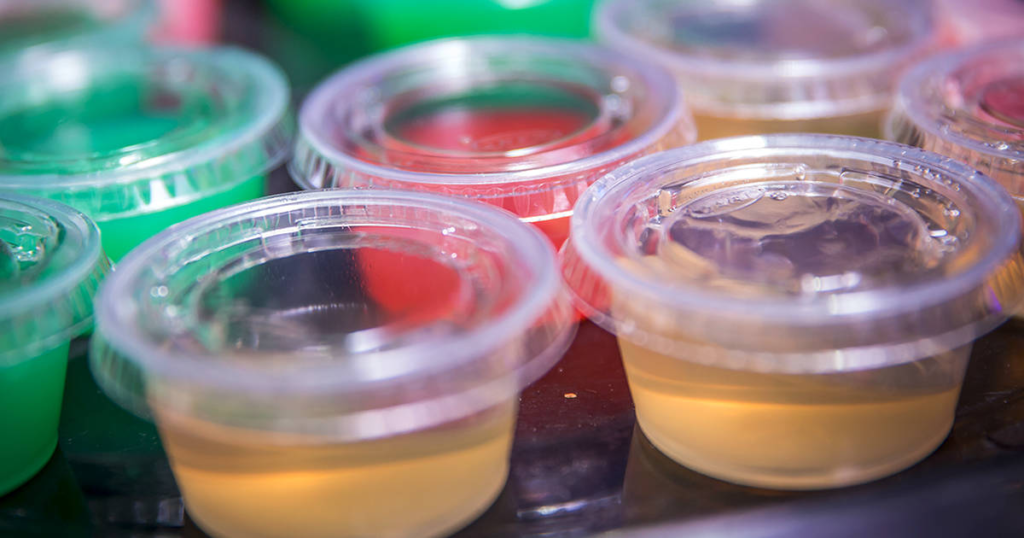
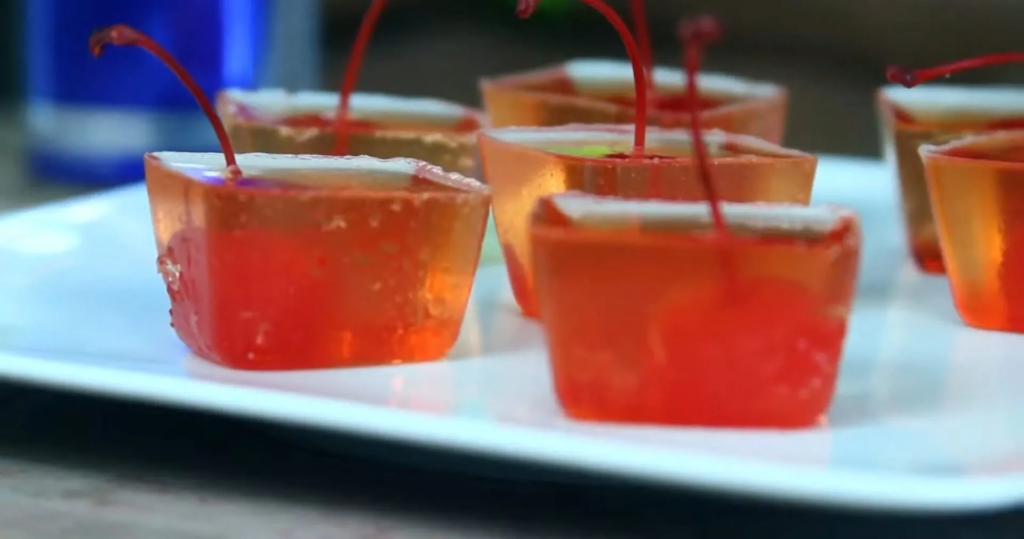
Short answer: Yes, you can put Jello shots in the freezer — but only briefly. Done right, it’s a time-saver. Done wrong, you’ll ruin the texture or end up with frozen booze slush.
✅ Why People Use the Freezer
To speed up setting time
When the fridge is full before a party
To firm them slightly for easier transport
❌ What Happens If You Freeze Them Too Long
Alcohol doesn’t freeze normally → separation
Gelatin structure breaks → rubbery or icy texture
Can turn into layered slush instead of smooth gel
Once ruined, you can’t fully fix them
⏱️ Safe Freezer Timing (Very Important)
Alcohol Amount
Freezer Time
Result
Low (½ cup per box)
20–30 min
Sets faster, OK
Medium (¾ cup)
15–25 min
Watch closely
High (1 cup+)
❌ Not recommended
Won’t set properly
Golden rule: 👉 Never exceed 30 minutes 👉 Never leave unattended
Set a timer ⏰
🧊 Step-by-Step: How to Use the Freezer Safely
Prepare Jello shots as usual
Let them cool 5–10 minutes (hot liquid = bad idea)
Place cups on a flat tray
Put in freezer uncovered
Check every 10 minutes
Once edges are firm → move to fridge immediately
They’ll finish setting perfectly in the fridge.
Image source: Thrillist
🧪 Texture Review (Honest)
Fridge Only ⭐⭐⭐⭐⭐
Smooth
Bouncy
Classic Jello texture ✅ Best quality
Freezer (Short Time) ⭐⭐⭐⭐☆
Slightly firmer
Still good
Easy to pop out ✅ Acceptable shortcut
Freezer (Too Long) ⭐⭐☆☆☆
Icy
Alcohol separation
Weird mouthfeel ❌ Party-ruiner
Pros & Cons of Putting Jello Shots in the Freezer
Speeds things up when you’re in a rush
Helpful if the fridge is packed before a party
Makes shots easier to transport
Easier to pop out of cups for serving
Useful if you forgot to make them ahead of time
Can save a party if timed correctly
Too long = icy, grainy, or rubbery Jello
Gelatin structure can break
Leads to separation or slushy layers
Strong shots are especially risky
Can’t “set and forget”
Needs checking every 10 minutes
Overnight freezing almost always ruins them
Not a replacement for refrigeration
⚖️ Quick Comparison
Method
Quality
Risk Level
Fridge only
⭐⭐⭐⭐⭐
Very low
Freezer (15–30 min)
⭐⭐⭐⭐☆
Medium
Freezer (too long)
⭐⭐☆☆☆
High
🍸 Pro Tips (Most People Don’t Know)
More alcohol = longer fridge time, not freezer time
Silicone cups help prevent freezer damage
Vodka works better than sugary liqueurs
If they start to freeze → fridge ASAP
🧠 Final Verdict
Use the freezer like a booster, not storage.
✔️ Yes — for 15–30 minutes max ❌ No — overnight or long-term freezing
If you want perfect Jello shots, the fridge is king 👑 The freezer is just a risky shortcut.
Fresh ginger can be safely frozen for 6 to 12 months if stored properly. For best flavor and aroma, most kitchen experts recommend using it within 6 months, but it remains safe to eat up to a year if kept airtight and frozen consistently.
🕐 Best quality window: 3–6 months
🥶 Still good to use: Up to 12 months (if sealed well, with no freezer burn)
Freezing does NOT make ginger unsafe — it just slowly reduces flavor and moisture over time.
Why Freeze Ginger?
Freezing ginger is one of the best ways to:
Prevent spoilage
Always have fresh ginger ready to use
Make peeling & grating easier (frozen ginger actually grates BETTER!)
Preserve nutrients and flavor longer than refrigeration
Refrigerated ginger usually lasts:
2–3 weeks in the fridge
Up to 1–2 months if stored in a sealed bag with air removed
So freezing extends life dramatically.
Image source: Cooking Gift Set Co.
🧊 Best Ways to Freeze Ginger (Step-by-Step)
1️⃣ Freeze Whole Ginger Root
Shelf life: ~6–12 months
How to do it
Wash ginger (optional to peel — you can peel later)
Dry it completely
Place whole piece in a freezer bag
Press air out
Seal tightly
Best for: Tea, soups, stews, curry bases Pros: Zero effort Cons: Takes longer to thaw and cut
2️⃣ Freeze Ginger in Slices or Chunks
Shelf life: ~6–9 months
How to do it
Peel ginger
Slice or cube
Spread pieces on a tray to pre-freeze (prevents sticking)
Move to airtight freezer bag or container
Best for: Stir-fries, marinades, sautés Pros: Easy to grab portions Cons: Slightly more prep
3️⃣ Freeze Grated Ginger (Most Popular)
Shelf life: ~6–9 months
How to do it
Peel ginger
Grate finely
Portion into teaspoon or tablespoon mounds
Freeze on tray OR fill into ice cube tray
Transfer to airtight freezer bag
Best for: ✔️ Smoothies ✔️ Dressings ✔️ Baking ✔️ Sauces ✔️ Indian / Asian dishes
Pros: Ready to use instantly Cons: You commit to pre-measured pieces
4️⃣ Freeze Ginger Paste
Shelf life: 3–6 months (shorter because more surface area)
Blend ginger (optionally with a bit of oil). Freeze in:
ice cube trays
silicone molds
small sealed packets
Great for:
Curry pastes
Garlic–ginger mixtures
Quick seasoning
❄️ Do You Need to Thaw Frozen Ginger?
Usually no.
You can:
grate it frozen
slice it frozen
drop frozen cubes straight into soups or curries
If you do need to thaw:
Leave at room temp 5–10 minutes
Or microwave 10–15 seconds
Image source: Eat, Little Bird
🧪 Does Freezing Affect Taste, Texture, and Nutrition?
✔️ Taste & Aroma
Flavor remains very strong for the first 3–6 months. After that, it may slowly weaken but still tastes good.
✔️ Texture
Fresh ginger becomes slightly softer after freezing — but this often helps with:
grating
blending
cooking
Not ideal for recipes needing super-firm ginger slices for garnish.
✔️ Nutrients
Most nutrients remain intact. Minimal loss.
Image source: Cooking Gift Set Co.
🚫 When Frozen Ginger Goes Bad
Throw it away if you notice:
Gray or dull brown color inside
Sour or rotten smell
Mold
Extreme freezer burn
Slimy texture after thawing
Review: Is Freezing Ginger Worth It?
Extends life up to a year
Saves money
Zero waste
Convenient
Great flavor retention
Easier to grate frozen
Texture softens slightly
Paste loses potency faster than whole ginger
Needs airtight storage
✅ Verdict
Freezing ginger is one of the BEST storage methods — especially if you cook occasionally or buy larger pieces.
Most people never go back to “fresh only” after trying it.
FAQs
Does frozen ginger last forever?
No. Best within 6 months, still usable up to 12 months.
Can you refreeze ginger?
Try not to. Divide into portions before freezing.
Can I use frozen ginger in tea?
Yes! Just grate or drop slices into hot water.
Can you freeze ginger with peel?
Yes. Peel becomes softer and easier to remove later.
Ice cream melts quickly, but the real concern isn’t the texture — it’s bacterial growth. Once ice cream starts to warm above freezing, it becomes a perfect environment for harmful bacteria like Listeria. Here’s everything you need to know to keep your ice cream safe and delicious.
General Rule: 15–20 minutes max
Ice cream should not sit out longer than 15–20 minutes at room temperature (68–72°F / 20–22°C).
After 30 minutes, the ice cream becomes soft, partly melted, and enters the danger zone (40°F–140°F / 4°C–60°C), where bacteria can grow rapidly.
After 1 hour, most food safety guidelines consider it unsafe to refreeze or eat.
Image source: Must Have Ice Cream
Safety Rules for Melted Ice Cream
✔ Safe to eat if:
It has been out less than 20 minutes.
It is still firm or just slightly soft.
It’s placed back in the freezer immediately.
❌ Unsafe to eat if:
It’s been out for more than 1 hour.
It is fully melted.
It was placed back in the freezer after melting (this traps bacteria inside).
It has been exposed to warm temperatures (picnic, hot car, sunlight).
⚠ Why refreezing is dangerous:
When ice cream melts, the dairy + sugar mixture becomes a warm liquid. Bacteria multiply extremely fast. Freezing again does not kill bacteria — they become trapped and can make you sick.
⏳ How Long Ice Cream Lasts Outside in Different Conditions
Condition
Safe Time Out
Why
Room temp (20–22°C / 68–72°F)
15–20 min
Softens fast; bacteria begin growing once melted
Warm room (25–30°C / 77–86°F)
10–15 min
Faster melting → faster contamination
Hot weather (30°C+ / 86°F+)
5–10 min
Ice cream becomes liquid quickly
Sunlight
5 min
UV + heat accelerate melting and spoilage
Car in summer
2–5 min
Car interiors can reach 40–60°C (104–140°F)
📦 How to Store Ice Cream Properly
Best storage tips:
Keep ice cream at –18°C (0°F) or colder.
Store it deep in the freezer, not in the door.
Use airtight containers to prevent freezer burn.
Keep the container upside down (this helps reduce ice crystals).
Avoid opening the freezer often — temp changes cause texture loss.
How long ice cream lasts in the freezer:
Unopened: 2–3 months for best quality
Opened: 1–2 months (Still edible afterward but flavor/texture will decline.)
🛑 Signs Your Ice Cream Has Gone Bad
Ice crystals/large chunks of frost
Grainy or sandy texture
Sour or “off” smell
Yellowish tint
Completely melted → refrozen into a brick
Strange aftertaste
If in doubt, throw it out.
Review: Best Ice Cream Brands for Stability & Quality
Some brands hold up better when briefly out of the freezer due to cream content and stabilizers.
⭐ Best Overall Creaminess
Häagen-Dazs – High butterfat, minimal additives, melts softer but tastes premium.
Ben & Jerry’s – Dense, holds shape longer, great mix-ins.
Slightly soft ice cream that’s been out less than 20 minutes is safe. Put it back in the freezer immediately.
How long can ice cream sit out in hot weather?
In temperatures above 30°C (86°F), ice cream should sit out no more than 5–10 minutes.
What happens if ice cream fully melts?
Once fully melted, bacteria grow very fast. The ice cream becomes unsafe to eat or refreeze.
How can I tell if melted ice cream has spoiled?
Signs include: Large ice crystals Grainy texture Sour smell Strange taste Hard “brick” texture from refreezing Yellowish color When in doubt, throw it out.
How long does ice cream last in the freezer?
Unopened: 2–3 months (best quality) Opened: 1–2 months (best quality) It may still be edible longer but with worse texture.
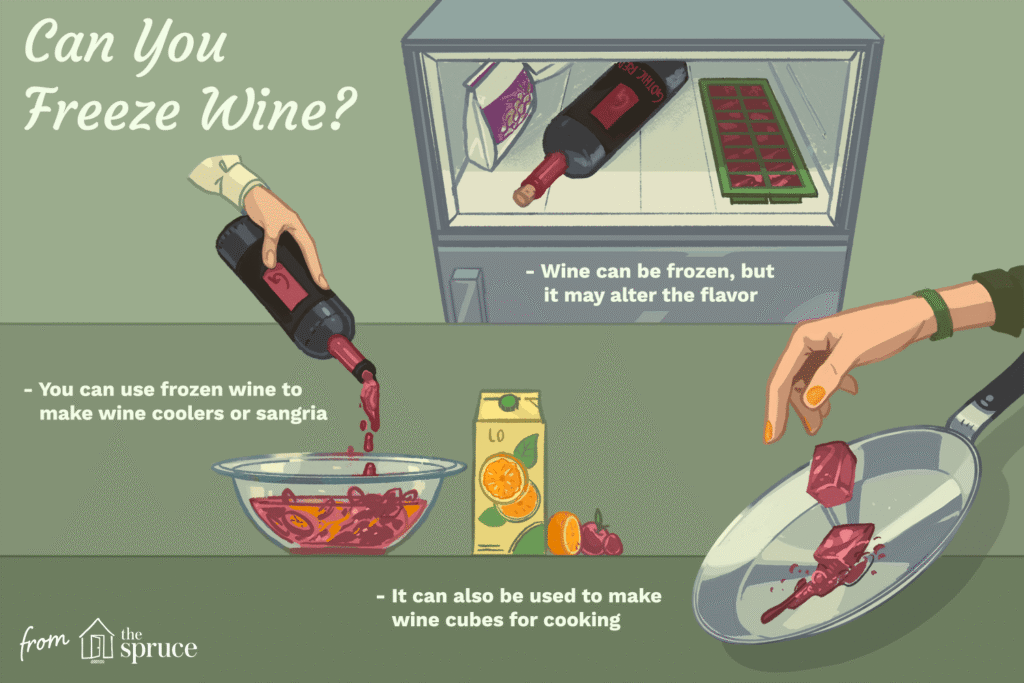
Yes, absolutely! Freezing sangria is a great way to preserve leftover batches or prepare it ahead of time. However, some ingredients (like fresh fruit and carbonation) don’t freeze well, so a few adjustments help maintain taste and texture.
What Happens When You Freeze Sangria
Wine and alcohol: Won’t freeze solid due to alcohol content. It becomes slushy.
Fruits: Can become mushy when thawed but still fine for flavor.
Carbonation (if used): Loses bubbles — so avoid freezing sparkling sangria or add the fizz later.
Sugar: Keeps the mixture smooth; unsweetened sangria may taste dull after thawing.
Image source: The Spruce Eats
Preparation Steps (Before Freezing)
Remove perishable ingredients
Take out any citrus slices, berries, or herbs if you want a cleaner flavor later.
You can freeze them separately if you wish to re-add them for garnish later.
Choose your container
Use a freezer-safe glass jar, plastic container, or ziplock bag.
Leave at least 1 inch (2–3 cm) of space at the top for expansion.
Label it
Write the date and type (e.g., “Red Wine Sangria – July 2025”) on the container.
Freezing Methods
Option 1: Freeze as a Batch
Pour sangria into an airtight container.
Freeze up to 3 months.
Thaw in the refrigerator overnight before serving.
Option 2: Freeze as Ice Cubes
Pour into ice cube trays.
Once frozen, transfer cubes to a freezer bag.
Use cubes to chill future sangria or wine without diluting flavor.
Option 3: Freeze into a Slushie
Pour into a shallow pan and freeze.
Every 30–45 minutes, stir or scrape with a fork until it becomes a granita-like texture.
Serve as frozen sangria slush directly.
Thawing and Serving
Thaw slowly in the fridge (6–12 hours).
Taste before serving — sometimes freezing dulls flavor, so:
Add a splash of fresh wine, orange juice, or brandy.
Add new fruit slices for aroma.
Sweeten lightly with sugar syrup or honey if needed.
Image source: Wine Insiders
Tips & Warnings
Don’t freeze carbonated sangria (e.g., made with sparkling wine, soda, or cava). It will go flat and might leak or explode.
Don’t refreeze once thawed — it loses flavor and texture.
Best fruits to freeze inside sangria: berries, cherries, grapes, mango chunks.
Fruits that get mushy: oranges, lemons, limes, apples — better to add fresh later.
You can, but it’s better to remove the fruit first. Citrus, apples, and soft berries can become mushy after thawing. You can freeze them separately and add fresh slices when serving.
Can you freeze sparkling sangria?
No — avoid freezing sangria made with sparkling wine, soda, or cava. The carbonation will disappear, and the gas expansion could cause leaks or bursting in sealed containers. If you want fizz, add the sparkling ingredient after thawing.
What’s the best way to freeze sangria?
Pour it into an airtight container or freezer bag, leaving 1 inch (2–3 cm) of space for expansion. Label it with the date. For portion control, freeze it in ice cube trays and store the cubes in a freezer bag.
How long can sangria stay frozen?
Up to 3 months for best flavor. It may still be safe after that, but the taste and aroma can fade.
How do you thaw frozen sangria?
Move it to the refrigerator and let it thaw slowly overnight (6–12 hours). Stir before serving. Add fresh fruit or a splash of new wine or juice to revive the flavor.
Can I make frozen sangria slush or popsicles?
Absolutely! For slush: Freeze sangria in a shallow dish and scrape every 30–45 minutes until it’s icy and grainy. For popsicles: Pour strained sangria into molds with a few fruit slices, then freeze 6–8 hours.
Does freezing affect the alcohol content?
No. The alcohol stays the same — it just prevents the sangria from freezing completely solid. When thawed, the strength remains consistent.
Yes — you can freeze both homemade and store-bought pâté (including chicken liver, duck liver, pork, or vegetable varieties). However, the texture may change slightly after thawing, as pâté contains a high percentage of fat and often cream or butter, which can separate when frozen.
Image source: Eat Your Beets
How to Freeze Pâté
1. Preparation
Cool first: If freshly made, let it cool completely to room temperature.
Portion: Divide into small serving sizes so you only defrost what you need.
Seal tightly:
Wrap each portion in cling film or foil.
Place wrapped portions in an airtight freezer bag or container.
Optional layer: Add a thin coat of melted butter or clarified butter on top before freezing. This protects flavor and prevents freezer burn.
2. Freezing Duration
Best quality: Up to 1 month
Acceptable: Up to 3 months
Beyond that: Flavor and texture decline.
Image source: Commercial Refrigerators
How to Thaw Pâté
Always thaw in the refrigerator (8–12 hours for small portions).
Never thaw at room temperature — it risks bacterial growth.
After thawing, consume within 2–3 days.
Do not re-freeze once thawed.
Pros & Cons of Freezing Pâté
Extends shelf life.
Easy to portion and store.
Works for both meat-based and vegetarian pâtés.
Texture may become grainier or slightly crumbly after thawing.
High-fat pâtés can separate (fat layer vs. meat).
Strong flavors may dull a bit.
Tips for Best Results
Smooth pâtés (like chicken liver) freeze better than coarse terrines.
Vacuum sealing gives the best preservation.
Serve chilled after thawing, not reheated — reheating worsens texture.
May become slightly grainy but overall good flavor retention.
Rustic/coarse terrine (with meat chunks, herbs, or vegetables)
⚠️ Not ideal
Texture becomes crumbly, separation of fat and meat likely.
Vegetarian pâté (mushroom, lentil, bean-based)
✅ Freezes fairly well
May release a little water when thawed; stir before serving.
Pâté with cream or butter
⚠️ Variable
Freezes, but fat and cream can separate; best eaten fresh.
Alcohol-infused pâté (with brandy, cognac, wine)
✅ Acceptable
Freezes okay, but delicate alcohol notes may weaken.
Canned pâté (unopened)
❌ Not needed
Shelf-stable, no need to freeze.
Canned pâté (opened)
✅ Freezes fine
Portion, wrap tightly, and freeze leftovers.
✅ Best to freeze: Smooth liver pâtés, vegetarian pâtés, opened canned pâté ⚠️ Freeze with caution: Terrines, pâtés with cream/butter ❌ Avoid freezing: Unopened canned pâté (lasts fine on the shelf)
Review Summary
Freezing pâté is a practical way to reduce waste and extend shelf life, especially for homemade batches. The main trade-off is texture — expect slight changes, especially in creamy or very fatty varieties. If frozen and thawed properly, the flavor remains rich, making it worth doing for most home cooks.
Final Verdict: ✔️ Yes, you can freeze pâté safely. ⭐ Best enjoyed fresh, but frozen pâté still tastes good if stored correctly and eaten within 1–2 months.
FAQs
How long can you freeze pâté?
Best quality: 1 month Acceptable: Up to 3 months After that, the taste and texture degrade noticeably.
Does freezing affect the texture of pâté?
Yes. It may become grainier, drier, or slightly crumbly, especially in fatty or creamy varieties. Smooth pâtés usually freeze better than coarse terrines.
Can you freeze pâté with cream, butter, or brandy?
Yes, but the higher the fat and dairy content, the more likely it is to separate or change texture after thawing. A protective butter layer on top helps.
Can you freeze canned pâté?
Unopened cans: No need to freeze, as they are shelf-stable. Opened canned pâté: Yes, you can freeze leftovers in an airtight container or wrapped portions
What is the best way to freeze pâté?
Cool completely. Portion into small servings. Wrap tightly in cling film or foil. Place in a freezer bag or airtight container. Optionally seal with a thin butter layer before freezing.
How should you thaw pâté?
Thaw slowly in the refrigerator (usually overnight). Never thaw at room temperature, as it can encourage bacteria growth.
Can you refreeze pâté once thawed?
No. Once thawed, pâté should not be refrozen. Consume within 2–3 days.
Does freezing change the flavor?
The flavor usually holds up well, but some delicate or boozy notes (like cognac or herbs) may become muted over time.
What types of pâté freeze best?
Smooth liver pâtés (like chicken or duck liver mousse) freeze well. Chunky or rustic terrines may suffer more texture loss. Vegetarian pâtés (bean, lentil, or mushroom-based) usually freeze fine but can become a little watery.